Tags 4 You #4 - Valentine's Day

It's Thursday and time for the final card in my series featuring the Tags 4 You stamp set and so today we celebrate Valentine's Day! Yes, I know, we haven't even made it to Halloween but it's good to be prepared...right?

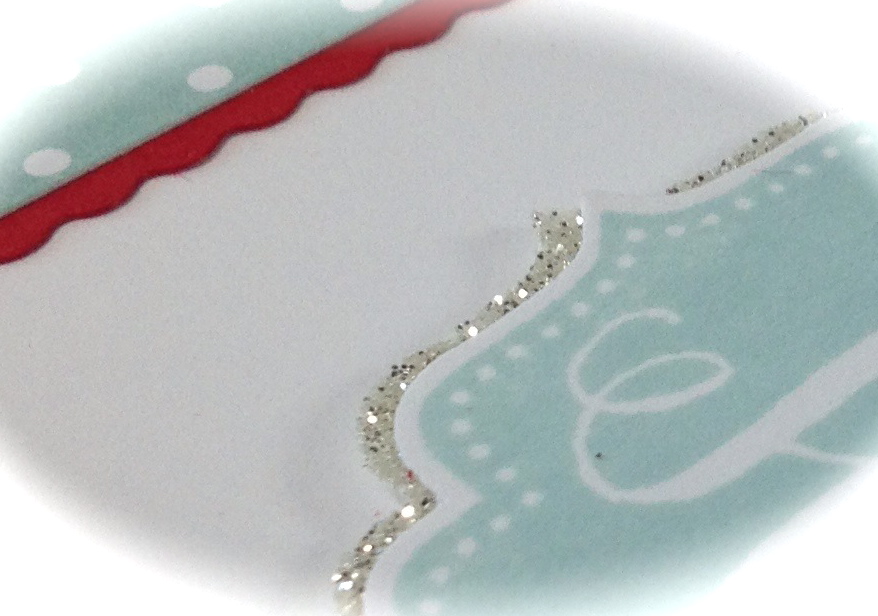
For my Valentine I wanted to tone it down just a tad so I chose to work with Soft Sky and small pops of Real Red and silver sparkle in the glimmer paper peeking out from behind the sentiment and in the 1/8" silver ribbon, available in the holiday catalog.

For being so small, the little red glimmer paper hearts sure pack a wow factor! And in case you are wondering, you will find the heart punch is part of the Owl Builder Punch.

So that's it! My clean and simple Valentine's Day card! I hope you have enjoyed this series and I thank you very much for coming on this journey with me. May you be inspired to create some wonderful cards for family and friends :)

Stampin Supplies:

Stamps: Tags 4 You (131820)

Paper: Whisper White (100730), Real Red (102482) Cardstock; Subtles Collection (130135) Designer Series Paper Stack, Red (121790) and Silver (124005) Glimmer Paper

Ink: Soft Sky (131181) Classic Stampin' Pad,

Tools: Stampin' Trimmer (126889), Stampin' Trimmer Rotary Addition (129407), Small Scallop Rotary Cutting Blade (129410), Label Bracket Punch (132153), Owl Builder Punch (118074), Stampin' Dimensionals (104430)

Embellishments: Silver 1/8" Ribbon (132137)

Tags 4 You #3 - Christmas

Whew! We made it to Wednesday and to card #3 in my series of 4 featuring the Tags 4 You stamp set...today we are celebrating Christmas!

Each card has been so much fun to make and I have enjoyed the special details of each. For this card I chose to use the old stand by of Old Olive and Cherry Cobbler, why? for the simple reason that they WORK. I just loovvveee this patterned paper from the Season of Style Designer Series Paper.

I also wanted to continue with the same general layout of my previous cards but, well, I really lack stamps that would work well...until I realized that in the Happy Hour stamp set is a little mistletoe stamp...PERFECT!!

So I inked the stamp up and then used my blender pen to clean away the Old Olive ink from the holly berry. I stamped the stamp and then went back in and added the holly berries with Cherry Cobbler Dazzling Details. I think that the sparkle of the berries and of the Red Glimmer Paper peeking out from behind the sentiment are the perfect bits of jewelry.

I felt that since the accents of the holly berries were so small that I should go with a bow instead of a simple knot...seems to balance the card out with the added bonus of looking like a wrapped present!

I'm really pleased with the final result and I very much hope you like it as well!

Thank you for hanging in there with me, tomorrow is the final card and I hope you will be back to check it out! Here's a bit of a teaser...

Stampin Supplies:

Stamps: Tags 4 You (131820), Happy Hour (126642)

Paper: Whisper White (100730), Old Olive (100702) Cardstock; Season of Style (132340) Designer Series Paper, Red (121790) Glimmer Paper

Ink: Cherry Cobbler (126966), Old Olive (126953) Classic Stampin' Pad,

Tools: Stampin' Trimmer (126889), Stampin' Trimmer Rotary Addition (129407), Small Scallop Rotary Cutting Blade (129410), Label Bracket Punch (132153), Stamp-A-Ma-Jig (101049), Blender Pen (102845), Stampin' Dimensionals (104430)

Embellishments: Cherry Cobbler (123125) Baker's Twine, Cherry Cobbler (125585) Dazzling Details

Thanks for stopping by!

Tags 4 You - Halloween

Hello there and happy Monday to you! I hope you had a wonderful weekend! I was feeling crafty this weekend and I am excited to share my creations with you! I recently purchased the Tags 4 You stamp set from the Holiday Catalog and decided to create four cards with it, which I will share with you over the next four days.

Here's the first one!

Do you like it?!? This was super fun to put together so let me share some of the details...

  •  I used the Bitty Butterfly Punch and then used the circle punch from the Itty Bitty Shapes Punch Pack to snip off just a bit of the bottom butterfly wings to turn it into a bat (thank you Jason Loucks for the idea) 
  • I covered the bat with 2-Way Glue and then sprinkled liberally with Black Stampin' Glitter (which can be found on pg 20 of the Holiday Catalog)
  • Stampin' Up! doesn't carry orange glimmer paper so I made my own using adhesive sheets and Orange Stampin' Glitter (sold as a set along with the Black Stampin' Glitter)
  • The wavy line on the piece of black cardstock peeking out from underneath the Witches' Brew Designer Series Paper was created using the new Stampin' Trimmer Rotary Arm and Small Scallop Rotary Cutting Blade. I love the understated effect. 


How fun and easy is that! I hope you liked this first card...please be sure to stop by tomorrow to see the next card in this series! Here is a sneak peek of tomorrow's project:

Stampin Supplies:

Stamps: Tags 4 You (131820)

Paper: Very Vanilla (101650), Basic Black (121045) Cardstock; Witches' Brew (132185) Designer Series Paper

Ink: Jet Black Staz-On (101406) Ink Pad

Tools: Stampin' Trimmer (126889), Stampin' Trimmer Rotary Addition (129407), Small Scallop Rotary Cutting Blade (129410), Label Bracket Punch (132153), Itty Bitty Shapes Punch Pack (118309), 2-Way Glue Pen (100425), Stampin' Dimensionals (104430)

Embellishments: Black & Orange Stampin' Glitter (132206), Basic Black 1/8" Taffeta Ribbon (119261)